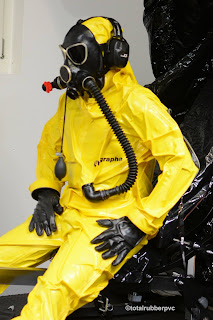
DIY Project – Modifying a hazmat suit to apply vacuum to the wearer
Hello everyone!
I am a huge fan of thick and heavy full protective hazmat suits and I love to wear them over rubber and plastic. Usually, those suits are big and loose fitting. Sometimes, this is what I want to feel. But sometimes, I wish to be seriously vacuumed and sealed tightly in those air-tight hazmat suits, so I can feel the pressure on my layers I am wearing underneath.
I already experimented with a vacuum cleaner
(sucking the air out of the suit and closing the zipper), but that was not
satisfying me at all. But then I have seen other guys who are sucking themselves
the air out of the suit by using a gas mask they wear. The imagination, that I
must apply a vacuum to myself by sucking the air (filled with the smell of
sweat, rubber and plastic) out of my hazmat suit slowly, drove me crazy.
In this DIY project I realized last weekend, I show you how I successfully modified my TESIMAX GS 3 Hazmat suit to apply vacuum to the wearer:
But now, let’s see how I got there !
MODIFICATION (DIY part) :
This is my TESIMAX GS 3 Hazmat suit before modification :
The required materials are :
1 Tank Connector 1 Inch Male Threads :
It's a polypropylene tank connector with a 1-inch BSP thread. One of the back nuts is fixed leaving a 20 mm length of thread. The other can be removed and then tightened up.
1 check valve :
It allows the air to flow through in only one direction.
The outer diameter of the check valve should be the same as the inner diameter of the tank connector. In my case, however, this was not exactly the case, so I had to sand the check valve a little bit.
By means of slight blows with a rubber hammer, the check valve was finally fitting in the tank connector without any adhesive.
This is how the check valve looks like (integrated in the tank connector).
Using a hollow punch (outer diameter
of the tank connector's thread), I finally made a passage for the tank connector.
After tightening up the nut of the
tank connector, the inside of the hazmat suit finally looked like this :
… and the outside like that :
TESTING THE MODIFIED HAZMAT SUIT :
After realizing that DIY project, I was quite curious, how good that modification is working. So, after suiting up into a full rubber layer and a transparent PVC suit as second layer, I got into that modified hazmat suit. Using a 1 Inch elbow connector with female threads and a male hose adapter (20 mm) with a 1 Inch male thread, I mounted the gas mask hose to my Russian PMK-2 gas mask.
Whenever I kept closed the inhalation valve on
the right side of the gas mask as well as the connector for the re breathing bag
in the middle of the gas mask, the only way to get some air was sucking the air
out of the hazmat suit.
After reaching a complete vacuum, the moment of truth has come : will the vacuum maintain? … YES !!! … I finally stayed two hours in that vacuumed hazmat suit and I never had to renew the vacuum – my modified suit was 100% airtight !!!
CONCLUSION :
If you already own a suitable Hazmat suit, the
required materials are quite cheap. Also, the DIY Part was quite easy to
realize.
The feeling of the pressure of the vacuumed
hazmat suit on my layers I was wearing underneath, was simply great. It felt
like dozens of rubbered hands were touching and teasing my whole body.
I assure you that I will spend hours and hours hermetically sealed and vacuumed in that suit in the near future!
totalrubberpvc


Those Tesimax suits are the best. I own a Sikan 2 model with the protection over the zipper which I modified so it can be locked with padlocks, making removing the suit impossible. I can post pictures if you want.
ReplyDelete